South Coast Track TAS (85km)
Wilderness Walking
Final Thoughts
Usually this is the last section of our longer trail reviews but if this review was a murder mystery, I would be telling you up front that ‘the butler did it’! This South Coast Track has always had the reputation of being physically demanding and the domain of experienced hikers and in many respects, I agree with that sentiment.
Another thing I need to say up front is that the South Coast Track is the most physically demanding thing I have done in my life; Ever! So why is that?
There are two key things that you need to know. First and foremost this trail, more than any other I have done, is impacted by weather. The main hiking ‘season’ for this trail is mid-November through to late-March and the variation of experiences you get due to rainfall, and heat/cold means that any review reflects a ‘point in time experience’ and may not reflect your trip. It fact if you hit this trail after an extended dry period, or a period of heavy rain/snow then your experience will likely be very different.
Second, at 85km in length, the South Coast Track isn’t overly long and on paper at least, shouldn’t be an overly difficult trail. In 2018 I undertook the 1000km Bibbulmun Track and that trail was all about endurance, essentially putting one foot in front of the other. The South Coast Track at 85km is essentially a grinding trail and much of my trip was spent doing step ups, step downs, squats, lunges, and to some extent a bit of parkour. I have never used my upper body on a hike as much as I had to do on this trail both – the trekking poles were well used but I also had to use the landscape to pull myself up and lower myself down!
There was some rain on my trip but not much. However this rainfall, combined with steady rains leading up to the start of my trip meant that when it did rain the trail became a creek bed. Between the water and the terrain, much of my trip was spent doing it as speeds of around 1km per hour or less. The rainfall also meant there were long sections of mud and in once case when I didn’t bother to check the depth, I sank crotch-deep on both legs!
This physically demanding track meant it was also mentally demanding. While I will often tune-out when I’m hiking, this track requires your full attention for much of its length. A comment that was made by a hiker in a group that was on the trail at the same time as me, was that ‘this track isn’t about the distance but rather the time’ and that’s the best way to approach this track.
What all this means is that its best to plan this trip in a conservative manner in regard to your typical speed and then allow a couple of days up your sleeve just in case. I did this and ended up rescheduling my pickup from Cockle Creek to a day later than originally planned rather than trying to increase my speed which would have made for some very, very early days to make up the time.
I loved doing this track and learnt so much about myself both as a hiker, and a person. While this track will never go on my top 10 list of hikes or my on ‘repeat list’, I’m very glad that I did it.
Starting location
- Melaleuca Airfield
- Why start here?
- This is the ‘typical’ way of starting this hike. Once you land, you walk your way out in whatever timeframe you have set yourself and finish your hike at Cockle Creek
- Why not start here?
- If the weather is really bad Par Avion, the airline that drops you off, may have to cancel the flight due to safety. If the weather is horrendous the start of your hike may be delayed a few days which may impact your ability to do this hike
- Why start here?
- Cockle Creek
- Why start here?
- The ‘less common’ way of starting this hike. You can drive in or get transport in from a company such as Tasmanian Wilderness Experience and you start walking
- This option isn’t weather dependant so you can start on your chosen day
- The ascent up the Ironbound Mountain is better than descending on this side
- If you are combining the South Coast Track with the Port Davey Track, this is where most hikers start from
- Why not start here?
- If you are just doing the South Coast Track then you are walking to meet your return flight out. This flight may be impacted if the weather and Par Avion, the airline that picks you up, may have to cancel your flight due to safety. If the weather is horrendous you just have to wait until the flights resume which could be a few days at worst
- Why start here?

Melaleuca Airport is the western trailhead when travelling west to east
Finishing location

Cockle Bay is the eastern trailhead and usual finish point
Best time to hike the South Coast Track
Year round
- Being a coastal walk this trail is very different to inland trails in Tasmania. However, the South Coast Track is impacted by the Southern Ocean which brings lots of rain and winds. This track can also be impacted by snowfall so you need to consider this anytime you are walking this trail, however unlikely
- Muddy conditions are something you should expect on this trail
Melaleuca weather averages
- November
- Mean Max 27.7°C
- Mean Min 17.2°C
- Mean rainfall 22.2mm
- Average rain days 5.3
- December
- Mean Max 30.8°C
- Mean Min 15.0°C
- Mean rainfall 10.8mm
- Average rain days 3.1
- January
- Mean Max 33.5°C
- Mean Min 17.2°C
- Mean rainfall 9.0mm
- Average rain days 1.9
- February
- Mean Max 33.4°C
- Mean Min 17.8°C
- Mean rainfall 13.1mm
- Average rain days 2.4
- March
- Mean Max 30.7°C
- Mean Min 16.2°C
- Mean rainfall 16.4mm
- Average rain days 3.5
The time of your hike will be driven by your reasons for doing this trail. Here are some things to consider:
- If you want a bit of solitude, avoid school holidays, Christmas and Easter
- Typically in summer you will always see other hikers even if its just at the camps
- If you don’t like the heat, avoid January and February as the temperatures can get quite hot compared to the seasonal averages
- If you don’t like the rain, skip November and March
Map

Trail image for the South Coast Track, Tasmania – 85km in total
- Image from Parks Tasmania
Nearest Town
- Geeveston which is around 1 hour from Cockle Bay on the way to Hobart
Trip Podcasts
If you want some additional information have a listen to the series of podcasts on this trip:
- Australian Hiker Podcast Episode 239-South Coast Track, an introduction
- Australian Hiker Podcast Episode 240-South Coast Track; Interviews from the trail-part 1
- Australian Hiker Podcast Episode 241-South Coast Track; Interviews from the trail-part 2
- Australian Hiker Podcast Episode 242 South Coast Track Expectations versus Reality
My Trip
Both Gill and I prefer to avoid the heat wherever we can so for us doing a hike sometime between late May to mid September works really well, or as close as the conditions will allow. In the case of the South Coast Track I was looking at undertaking this track some time form mid November through to early December to minimise the impact of snowfall and to fit in with an overseas trip we had planned in late December. In the end, I started this walk in early December which worked out well because my mid November option ended up with heavy rain and snowfall down to 500 metres and would have greatly increased the difficulty of the trail.
This write up takes you through the trip day-by-day. Based on my experience, I also offer some suggestions on how to get the best from this adventure. In addition, we have released a series of four (4) podcast episodes (see links above) that provide an alternative way of finding out more about this trail.
There is also a slide show of this walk (see below) containing many more images and videos than could possibly be included in this write up. This slide show offers the best visual guide of what you can expect.
The Lead Up
This hike was my third multi-day hiking trip for 2022. The South Coast Track was never high on my list of hikes to do with Gill so this was one I was always going to do as a solo hiker. Time wise I had always wanted to do this hike in November-December purely from a logistical perspective although earlier in the year often presents a drier option.
I spent a number of months planning this trip using the Parks Tasmania website and I also purchased a copy of the South Coast Track Guidebook. In addition, I also talked with some hikers who had done the track. I must admit I had originally intended to start this walk two days earlier however the flights into the western trailhead of Melaleuca with Par Avion Airline were booked up so I ended up starting my hike on the 9 December 2022. Gill and I had already locked in an overseas trip so the start and finish of this hike was limited to a specific window. This included a couple of extra days up my sleeve in case of poor weather conditions on the trail.
Logistically, getting to the trailhead isn’t difficult but it does make you really think about the trip and if you’re flying in from interstate, you need to allow some leeway. Over the past few years I have lost confidence in the Australian domestic airlines having experienced so many flight cancellations and last minute reschedules. As such while it was technically possible to fly from Canberra and catch a connecting flight to the Melaleuca trailhead, there was absolutely no room for error so I opted to arrive in Hobart the day prior to catching my flight to Melaleuca. One thing to note is that if the weather conditions are really bad, it may be necessary to reschedule the flight to Melaleuca for safety reasons – this was perhaps my biggest fear because it may have impacted the other end of the trip as it butted up against my overseas travel.
I suggest you book your flights at least two months in advance otherwise you may not get your desired dates. Having said that Par Avion, will run custom trips but that will impact on the cost. You will also need a Tasmania Parks Pass which at the the time of this review in 2022 was just under AUD $42.00 RRP – its valid for two months so if you’re doing multiple hikes, it can work out quite cheap.
South Coast Track Guidebook is an essential resource for trip planning
Day 1 Melaleuca to Point Eric Campground
- Distance: 13.4km
- Duration: 3 hours 45 minutes
- Maximum Elevation: 43 metres
- Minimum Elevation: 3 metres
Before heading to Tasmania I had planned for this day to be purely one to travel from Hobart to the Melaleuca trailhead and hadn’t planned on starting the hike until the next day. The reason for this was that I still had mainland Australian thinking in my head – even though I realised that the further south you go, the longer the daylight hours. In fact in December in Tasmania it’s light from 5:00am-9:00pm. So even before taking off, I had decided I would hike the 13.4km to Point Eric after arriving at Melaleuca.
The flight to Melaleuca wasn’t until 2:15pm so after hanging around and having lunch it was off to Cambridge Airport which is a short distance away from the Hobart’s main airport. The light plane flight was due to land me into Melaleuca at around 3:30pm but the weather conditions resulted in a delay and an arrival time closer to 4:00pm. This still allowed me time to pick up my gas 230 gram gas cylinder, wander around and take in the campsite. Melaleuca is the only campsite on the South Coast Track with sleeping cabins and if you are taking things nice and slow, staying here for the night will be the last of your indoor sleeping options.
I headed down to the visitor kiosk, signed in on the trail and I was off. The trail starts just across the runway and within 5o metres of leaving the runway I was ankle deep in water and my socks were soaked. My master plan was to carry three pairs of the socks and change into dry socks each day but my socks getting wet so quickly into the hike was a sign of things to come. Its almost a given you will end up with wet feet regardless of wearing waterproof footwear or not, unless you manage to catch a break on the weather.
This first section to the Eric Point Campground is the fastest of the whole trail being mainly metal mesh and boardwalk but also some natural trail. The elevation change is minimal and this section provides a deceptively easy start to the trip. Much of the boardwalk on this section consisted of two boards side by side, some of which were submerged. There was a lot of open grassland along with bushland and culminated at the ocean which is where Point Eric Campground was located.
I started this section at 5:00pm and finished just after 8:46pm and yes it was still light! I quickly set up my tent, had dinner and by the time I headed to bed, it close to 10:00pm. I realised that this was the latest I had ever hiked before and also the latest I had ever stayed up on a hike – usually I’m well and truely asleep by 7:30pm. The weather on this held section held up for me and at no stage was I cold!
The Point Eric Campground is considered a ‘major campsite’ and this means it will hold multiple tents – on this day there were 12 hikers in 9 tents with space for more. More importantly there is a composting toilet at the major campsites but no toilet paper, so remember to bring your own. The tent sites sit underneath tree cover with the toilet (single) tucked away at one end.

Par Avion office at Cambridge Airport

Salmon farms from the air
Light plane at Melaleuca

Toilets at Melaleuca

One of the huts at Melaleuca

Trail sign-in hut and foot cleaning station

Trail sign-in point and information hut

Trailhead across the runway. My feet were saturated 50 metres after passing this sign

Trail example day 1

On the way to Point Eric. Sometimes the boardwalk is flooded

Native shrub in flower

Tea tree in flower

On the way to Point Eric

Beach walk

Back into the bush and heading to Point Eric. Look for the ‘buoys’ that mark the trail

Toilet at Point Eric

Inside toilet view

Point Eric Beach
Day 2 Point Eric to Louisa River
- Distance: 18.6km
- Duration: 8 hours 15 minutes
- Maximum Elevation: 242 metres
- Minimum Elevation: 3 metres
Last night was probably the best night’s sleep I have ever had on the trail, in part because I have a brand new sleeping mat but also going to bed late, meant I pretty much slept through the night, lulled to sleep by the sound of the adjacent ocean. After using the facilities and having breakfast I packed and headed off for what would end up being the longest day, distance wise, of the trip but by no means the hardest. I travelled at an average speed today of just over 2km per hour.
I left camp fairly early starting with a beach walk and approximately 300 metres into the walk I stopped at a small stream/inlet crossing to top up on water for the day. The beach walk was short before making my way inland and starting my way towards the first decent ascent of the trip, Red Point Hill. If you are using the 1st/2nd edition of the guidebook you’ll be expecting lots of mud however the Tasmanian Parks Service has put a lot of effort into this section and much of what was the main muddy part of this section has now been board-walked removing the main obstacle for the day. As you cross the open button grass plains you start to ascend Red Point Hill and at this stage the trail becomes more natural and with it wetter, at least on the day I was walking. The ascent up Red Point Hill is steep but only reaches around the 24o metre mark providing a bit of practice for what’s to come. You never reach the main summit of this peak but the views from the main shoulder on the ascent are excellent before you round a curve and pick up views from the other side. There is a logical stopping point that was dry just on the edge of the trail that is a great place to sit for a break before starting my descent. Throughout the day the white trail line is visible so its easy to see where you’re heading. The descent was much easier than the ascent with the trail being mainly dry and only containing a few steep sections here and there.
I came across the first of the west bound hikers who had started their trip from Cockle Creek. When asked about the ascent on the Ironbound Ranges which I would be doing the next day, they didn’t paint a good picture as the ascent included strong winds at the summit and white out conditions. At least in my case the forecast was looking good.
I continued to make my way towards the Louisa River Campground crossing a couple of smaller rivulets that often appear in images for this trail that contain wooden steps down into the water with rope to assist hikers to cross when the water levels are up. One thing to note here is that these ropes aren’t actually located in the best locations. In fact if you stay to the right of these ropes (when travelling east) the water is about 40cm shallower so unless the river flows are strong, avoid the ropes. The biggest river crossing is at Louisa River itself and its here that the flows were one of the strongest of the trip. You do need to hold onto the rope to maintain stability so put your poles away and keep your arms free. You can camp on either side of the river but I would recommend you cross over so you start your next day with dryish feet.
As I approached the Louisa River Campground the Ironbound Mountain ranges continued to grow in size and from a distance, the ascent looked treacherous. The way up became more apparent the closer you got to the range with all the fine detail coming into focus.
The Louisa River Campground has lots of tent areas to choose from including some just past the toilet facilities that are a bit hidden and provide more privacy. Like the Point Eric Campground this is considered a ‘major campsite’ and what this means is that it will hold multiple tents. One thing of note here is that some of the trees in the camp look a bit unstable so pay attention to where you set up your tent.
After a long day travelling at a reasonable pace I ended up having a very early dinner at 4:30pm, and was in bed by about 6:30pm.

Start of walk on day 2 leaving Point Eric

Water top up day 2, just a few hundred metres from the Point Eric Campground

Look for the buoys that market the on/off points to the beaches

Trail example day 2
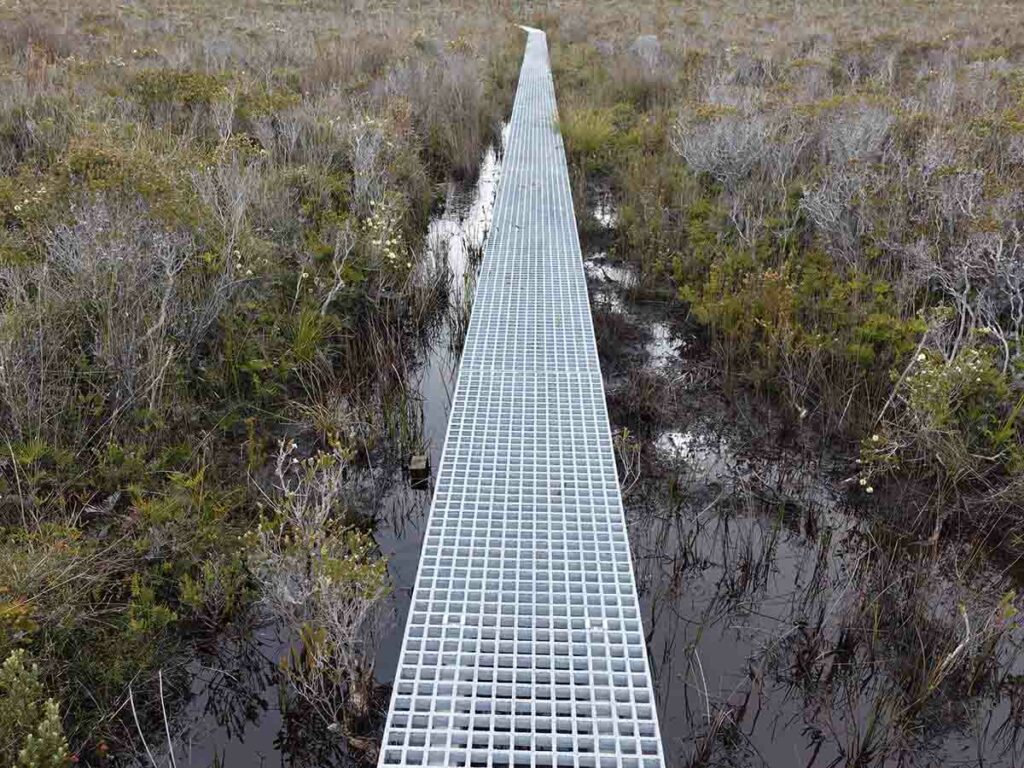
Mesh boardwalk day 2

Native plant day 2
Trail example day 2

Muddy trail on day 2
Mesh boardwalk. This large section of mesh has greatly improved this section

Creek crossing on day 2

Banksia in flower

Approaching the Louisa River Campground with the Ironbound Range in the distance

Hikers crossing Louisa River

My campsite at Louisa River
Day 3 Louisa River to Little Deadmans Bay
- Distance: 12.3km
- Duration: 11 hours 30 minutes
- Maximum Elevation: 914 metres
- Minimum: Elevation: 7 metres
Today started out a bit strange. I usually leave my stove in my vestibule with water ready to go the next day but I had a bit of a brain snap on this trip and left my spoon, cup and rubbish bag out – wasn’t that a mistake! I started to make my tea and realised that my spoon and rubbish bag had gone. I managed to retrieve my rubbish bag which just had a small hole in it but my spoon was gone. Australian animals seem to love the texture of silicone for some reason. I assumed that the culprit was a bush rat but discovered over the next few days that a Spotted Quoll was the most likely culprit – a bit of a rarity on mainland Australia but very common down here, and very quiet.
It’s hear I’ll say that I was preparing to whittle an eating utensil which I’ve done in the past but one of the other hikers offered up a spare spoon which solved my problem. Hikers as an fraternity really do look after each other, thank you!
Day 3 for me, for every hiker on this trail, provided the biggest physical challenge crossing given the need to cross the Ironbound Ranges. After leaving the Louisa River Campground I made my way through a small forested area prior to exiting on an open plain, crossing boardwalks that at times were submerged just enough to wet the feet. The Ironbound Ranges are well and truely in focus now and the way up becomes more apparent with an initial ascent up a lower shoulder, a walk along a ridge, and then what appears to be the final ascent to the summit but is actually a lower high point rather than the summit itself. This ascent is slow going and gruelling but manageable and on my day the weather was at the peak for the trip and actually got on the warmish side.
When you occasionally turn around the views become more and more spectacular as you ascend looking over the broad Button Grass plains with the occasional small hillock and out to the ocean. For me these views were the highlight of the trip. I continue to make my way up what appears to be the summit and a strategic lookout before continuing on around the false summit as I make my way towards the real high point itself which is still a way off as you make your way along the ridge over undulating terrain. I finally reach the peak after being passed by most of the other hikers as I stop to take images and do recordings and if I’m honest the ‘young’ns’ are just faster!
As you reach the high point just off trail about 30-40 metres is a higher point and if you have Telstra coverage, you can send and receive text messages but that’s not guaranteed. I sit at the summit taking a short break and have a quick lunch remembering I’d just recorded a podcast saying the weather was good just as the rain came in from nowhere. I push on with the descent. The initial descent consisted of boardwalk which I found annoying due to the spacing as I just got into stride and then had to step down which slowed me down finding it a bit stop start. Shorter hikers probably wouldn’t find this an issue. I had some narrow and muddy sections at this point but when I reached the shoulder and started the descent for real, things changed.
This descent took me a number of hours (I ended up travelling around 1km per hour) and was by far the hardest part of the trip. The weeks of rainfall in the previous weeks had saturated the ground so any new rainfall quickly ran off and unfortunately the point of least resistance for much of the descent, was the trail itself which became a creek bed. This descent can best be described as a nightmare and while it would be a very different experience going up instead of doing it on a dry day, I found myself stepping down, stepping around, lowering myself down by holding onto trees and moving under the many tree falls rather than ‘walking’. I expected the large sheets of rock that were occasionally in the middle of the trail to be slippery but they had enough grip to be confident on the footing. The mud on the descent was a different situation. Overall this descent has the potential to be treacherous and moving quickly is a risk. If you injure yourself on this section of trail the options are to be carried out or walk out, so take it slow. Hiking poles are a must for this trip and for this section as well although you will spend a lot of time using your hands as well as your poles.
The end point on this section is the Little Deadmans Bay Campground, again another coast camp. As I exited the Ironbounds I expected the trail to become easier and while it did there were challenges even here. Something that you need to know is that this is a wilderness trail which means limited signage and when I approached the small river/large creek on this section, I needed to look for the trail given the trail is marked badly by some small bits of tape to the right rather than what I thought was the the trail to the left. In addition there was a very large tree that had fallen on the trail which presented a navigation challenge.
As you make your way to the campsite you will cross a creek that is a possible water source about 500 metres out from the camp however there is a better option just past the camp with better quality water.
This camp has a lovely feel and is again adjacent to the water but one thing you do need to know is that Little Deadmans can best be described as ‘leach city’. I don’t know whether it was just at this time of the year but no other campsite had this issue. I was sitting at one of the little makeshift tables and discovered a leach crawling up my pants. I flicked it off and kept on making dinner and minutes later there was another, and then another. I had also rested my tracking poles against a tree and discovered a number of leaches on the top of the poles looking to go further. Put simply while you’re outside your tent you can’t stand still for very long at this campsite. Another early night.

Trail example start of day 3

Trail example leaving the forested campsite and onto the open grassy plains
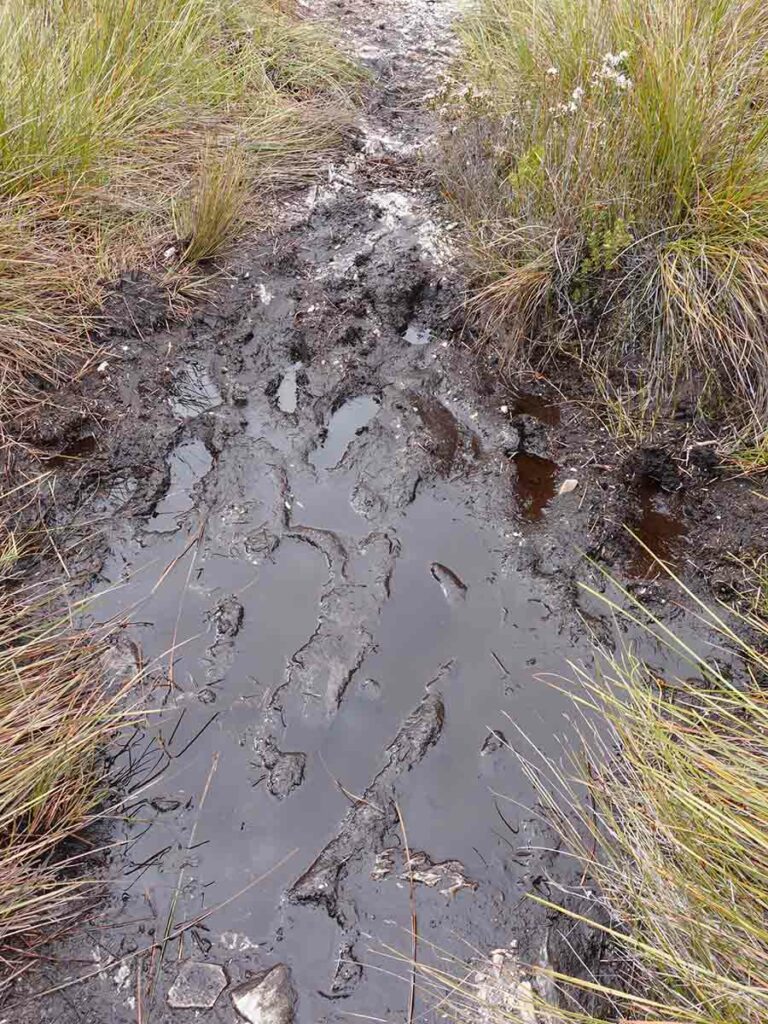
Every so often you get muddy sections

Panorama view half way up the Ironbounds

Tim on the South Coast Track (image by Andrew Brown)

View from higher up on the Ironbounds

Making my way towards the top of the Ironbounds

Waratah in flower on the Ironbounds

Trail example towards the top of the Ironbounds on the descent

A good section of trail coming down the Ironbounds. The conditions were so challenging I have almost no photos which is unique on my trips given I needed to focus on walking

Native flower
Day 4 Little Deadmans Bay to an on-trail campsite
- Distance: 14.4km
- Duration: 12 hours
- Maximum Elevation: 152 metres
- Minimum Elevation: 2 metres
Today I intended to travel to Surprise Bay but by the end of the day, I was about 2km short because I was loosing focus and ended up camping just off trail in a flattish area. This was another day of travelling not much better than 1km per hour due mainly to the slippery conditions on the trail and the boat crossing at New River.
I managed to get away from little Deadmans fairly early and headed to the longest beach walk on this trip that requires you to have your water supply topped up. The beach walk was quick and relatively painless. Where I started to slow down was the New River boat crossing. Ideally you want to hit this crossing at high tide if you’re travelling solo because you need to physically drag the boats to the water and even as a strong and large male I found that bouncing the boat along was still a hard task. There is a single boat on each side and you need to leave it that way so in most cases you will need to do three trips. One for the crossing, the second where you drag the boat on the other side into the water and row back to drop off a boat, and then the return trip. I found this took me about an hour all up and I was physically very tired after this crossing so I stopped and had lunch on the opposite side.
Once I continued walking it was paralleling the New River for a distance prior to turning inland then uphill. While this hill section was by no means the same as the other bigger hills on this trip, it was very muddy and wet and required constant use of tracking poles and lots of arm effort.
This section also includes a turnoff to Osmiridium Beach for those taking their time but I opted to continue on. From this turn off, the next couple of kilometres is some of the muddiest on the trail. In fact the one time I didn’t check the mud as I walked I sank crotch deep into it! This is probably the main reason for wearing gaiters because after just sitting there for a couple of minutes I started to pull myself out and without gaiters, my shoes would have come off and I would have spent the next hour or so digging them out. Apart from regretting not testing the mud depth, I regretted not having someone to be able to take a photo of me!
The undulating hills and muddy trail continued and as I started to lose focus and despite there being lots of daylight left, from a safety perspective it was time to stop. I definitely slept well that night and managed to avoid the evening showers.

Trail example day 4

Beach walking

Campsite marker on the way to Surprise Bay

Boat crossing point at New River

Trips across New River done. Typically you will need to do three trips to ensure that a boat is left on each side. This is a physically demanding process so if possible, aim for high tide

There is a trail there

Bridge past New River

Turn off point to Osmiridium Beach. If you are continuing to head to the left towards Surprise Bay this was probably the worst section of the track at the time I did this walk. In fact the only time I didn’t bother to check the depth of the mud I sunk crotch deep! Always check the mud depth

Very muddy section on the way to Surprise Bay
Day 5 On-trail campsite to the top of South Cape Range
- Distance: 10.93km
- Duration: 12 hours
- Maximum Elevation: 465 metres
- Minimum Elevation: 1 metre
Another early start to this day and I’m behind schedule falling short of Surprise Bay yesterday by around 2km. After getting up and feeling much more focused, I hit Surprise Bay in just over an hour which included a short beach walk and an inlet crossing across what is described in the guidebook as potentially dangerous in bad conditions so a low tide crossing is the way to go where possible.
After making my way through Surprise Bay I continued on up another tallish hill, again another muddy and wet trail before hitting Granite Beach. If you walk along Granite Beach at low tide and flat seas you would be able to do it on sand but in my case I had a short sand section and then spent a slow walk navigating round smallish boulders that required me to focus my attention to ensure I didn’t injure myself. I had a great degree of concern as I approached the turnoff point because all I could see was a long rope with buoys and thought that if that was the access point, I was about to turnaround. I decided to drop my pack and walk up to the waterfall and discovered that the access point while still requiring a scramble, wasn’t that bad. Between going back and grabbing my pack and returning to the ascent, the tide was definitely coming in and wouldn’t have been accessable for much longer. The climb takes you to a creek, the water supply for the waterfall, that was flowing steadily when I came through.
The campsite at Granite Creek was my lunch break and while I didn’t stay this camp had that special feeling about it with multi level campsites and tucked away from the elements. If you have the option and it fits in with your schedule this camp is worth the stay. After a pleasant lunch break it was time to head on and this time for a larger hill ascent and again a muddy trail with running water pretty much all the way to the top.
Almost straight away from leaving the campsite the mud cut in and the trail uphill became as bad as it gets. In fact I’ll go as far as say that I couldn’t have done the ascent without tracking poles with the mud being so slippery you definitely needed four points of contact. Again due to the rock walking and the mud on the South Cape Range, it was slow going again travelling at around 1km per hour. I had already decided to extend my trip by a day so wasn’t too fussed about pushing through to South Cape Rivulet Campground. In all honesty because I was travelling at around 1km per hour due to the conditions, that was never going to happen so I planned to stay at a designated on trail campsite on the descent side of the hill at the 400 metre altitude spot. The site worked well and a couple of leaches found my tent through the night but it was very sheltered. Once I’d set up the tent and had dinner, it was another early night.

While I managed to remain reasonably leach free – expect to get a ‘bite’ or two on this track

Inlet crossing prior to Surprise Bay Campground

Up the slope to Surprise Bay Campground. Use the rope!

Granite Beach sign

Onto the beach. The main beach is just around the corner so you may get wet feet if the conditions are against you

Short sand walk along Granite Beach. If the sea conditions are flat and the tide is really low then you will have a longer sand walk off the rocks

Waterfall at Granite Beach

Up the cliff (to the left of the waterfall) – its easier than it looks

Waterfall source at Granite Beach
Day 6 Top of South Cape Range to Cool Bluff (East Campsite)
- Distance: 9.56km
- Duration:10 hours 30 minutes
- Maximum Elevation 465 metres
- Minimum Elevation 5 metres
Another slow day due to the conditions and if I’m honest I was dawdling knowing that I had plenty of time. Other hikers who were heading off from the South Cape Rivulet Campsite advised that the trail from that campsite back to Cockle Creek was in reasonably good condition for the majority of its length. I could have very easily stopped at the South Cape Rivulet Campsite. The inlet crossing was a concern but when I arrived at the inlet I decided to test it out using my trekking poles to feel the way and after getting more that half way at waist depth pushed on with the crossing. I could have crossed closer to the ocean which would have been slightly shallower but was happy with my choice to cross where I did. In bad sea conditions, heavy rains, and high tide you may have to wait for low tide to cross.
After spending some time at the campsite for a quick lunch I pushed on. Rather than feel stressed on the last day given I had to meet my bus at 12:30pm I opted to stay at one of the minor campsites and decided that I was either going to stay at the Lion Rock campsite or the minor campsite at the other end of the beach which is what I ended up doing leaving me only around 7km for the last day.
The first section of the trail until the large hill is wet, muddy and with a bit of undulation. I come across my second snake of the trail this time right in the middle of the trail. I scan the trail as a matter of course on any walk and saw this small black snake motionless in the middle of the trail. I look closer and see that its leaking clear red fluid from its head – it looks like someone hasn’t seen it and trodden on its head. It occasionally sticks its tongue out but its not long for this world. I use my trekking pole to lift it off the trail and move on.
As I continue to walk along the trail paralleling the coastline, I eventually come out onto the beach with the campsites. The first campsite is off to the left up a long set of stairs and the second is down the other end of the beach. Its apparent that in bad conditions that you may not be able to access the beach which will dictate the campsite to use. The guidebook talks about the stairs at the eastern end being timber but most of them have been upgraded to stone steps with a short section of timber at the top. You cross at the cliff top and as you make your way across there is a sign that, and I’m paraphrasing here, says ‘cross at your own peril’. What option do you have? Turn back and head back to Melaleuca? The crossing is safe but they want you to keep well away from the edge which is only fair.
The on-trail campsite is at the top of the cliff at 34 metres altitude and while you can hear the wind the site is really protected. There is only one campsite which requires you to spend a bit of time working out how to pitch your tent to get a flat lay. I did that and then offset it about 40 centimetres and ended up on a slope, my bad.
I ate dinner in sunlight, out of the wind and even managed to dry my wet pants out for the first time in three days.

South Cape Rivulet warning sign

South Cape Rivulet after crossing

South Cape Rivulet camping site

Beach at South Cape Rivulet

Trail example day 6 after leaving South Cape Rivulet

Heading down onto the last beach of the trip

Stairs up to Lion Rock campsite

Down the beach

Coming off the beach

Trail marker up on the cliff. Keep away from the cliff edge for obvious safety reasons

Tent on the last night
Day 7 Cool Bluff (East Campsite) to Cockle Creek trail head
- Distance: 6.98km
- Duration: 3 Hours
- Maximum Elevation: 41 metres
- Minimum Elevation: 7 metres
The shortest day both distance wise and time wise on trail. My bus transport is scheduled for 12:30pm so I’m on a time deadline and no matter how easy the walk is supposed to be there is always pressure. I only have just on 7km to do so it shouldn’t be too bad. I do this walk in just on 3 hours at a dawdling pace. Even had I done the walk from South Cape Rivulet Campsite I could have done it however that would have definitely been a pressure and I would have felt obligated to start walking after 5am just in case.
After packing up and heading off I immediately notice two things. First up is some animal shot across the trail and as I look into the bushes I see a Spotted Quoll which moves before I can get a photo. They definitely seem accustomed to humans and them being a source of food. The second thing I notice is mud and while its doesn’t last for long and overall this remaining section of the trail is pretty good. The trail up until today is all about ‘there’s a hill lets go over it’ while today is about how can we avoid the hills so while there is some undulation, it’s slight, clean and very easy to walk. The trail consists of sections of natural trail but also contains boardwalk as well. Mobile phone reception comes back in as you approach Cockle Creek (Telstra text, phone and internet) but I manage to control myself until until I reach the trailhead.
This trailhead is very popular with day walkers who want to get some trail time as well as those looking for a two day walk with camp time in between.
The trailhead at Cockle Creek has parking and toilet facilities (complete with toilet paper) and a large visitor information kiosk. Today is the coldest day on record in Hobart and its not much better where I am. Its the first time I have dragged out my puffy jacket and I stay inside the visitor centre for the 3.5 hour wait I have until the bus arrives.
While I’m waiting for the bus, the tourists who stop in to view the information signage chat with me and I even had a caravaner provide me with a cup of tea and biscuits because I must have looked a bit cold.
I’d organised transport through Tasmanian Wilderness Experiences and while they run scheduled transport bookings I have booked my own which isn’t the cheap option but given I have overseas flights booked in a few days I (and Gill) was happy to pay the extra fee. This company also runs tours so I know from talking to other hikers on the trail that they are very knowledgable about this trail and are very helpful in answering questions people may have.
We do the 120km-ish trip back to Hobart, stopping quickly to grab some food along the way, and the trip is over.
The ‘Final Thoughts’ are at the top of this article if you haven’t already read that section.

Trail example last day 2

Trail example last day 3

Trail example last day

Foot cleaning station at the Cockle Creek trail start

Trail kiosk at Cockle Creek

Inside the information kiosk at Cockle Creek

The gist of this comment is be conservative when planning this trip
Trailhead signage Cockle Creek

Toilets and car park at Cockle Creek

Tim at the Cockle Creek Trailhead

Visitor centre at Cockle Creek

Cockle Creek Visitor Centre
Flora, fauna and the broader environment
- Not a huge wildlife trip
- Spotted Quoll
- Two snakes
- One ‘dead-ish’
- One tail only as it shot off the trail approaching Louisa River
- Numerous Pademelons (kangaroo family)
- One Wallaby
- Lots of birdlife both sea birds and land birds
- Coastal bushland
- Plenty of native plants in flower
- Tasmanian temperate rainforests
- Some of these had that magical tunnel feel about them
Trail video
This short video (just over 8.5 minutes) contains photos and videos to show you the walk from start to finish. Please note that the worst of the mud isn’t really shown in this slideshow as I just didn’t have enough hands for blogging and walking!
Best Bit/Worst Bit
- Best Bit – the ascent of the Ironbound Range (west to east)
- The views are spectacular and it gives you a real sense of achievement
- Worst Bit – the descent of the Ironbound range (west to east)
- It had been raining in the weeks leading up to the trip and its was raining on the ascent. I spent many hours essentially walking down a creek bed, up, down, over and around tree falls
In Style
There are a number of companies that provide guiding options on this walk for those who want someone to take care of all the hard stuff
Getting There

For most hikers starting at the Melaleuca Trailhead is the best option and you will fly in with Par Avion Airline
Things to Know
- Phone:
- The phone signal on this trail is pretty non existent (Telstra). You can just get text messages at the top of the Ironbound Ranges so it would be even less reliable with other carriers
- In most case you may be able to send text messages and make phone calls at the higher points along the trail but internet access is limited. Even when we did have internet access the signal was usually poor so it drained our phone batteries quite quickly
- Water:
- Water is available at each of the major campsites and along the trail at various locations
- You should filter the water
- Toilets:
- The only toilets are at the major campsites
- No toilet paper is provided with the exception of the trailhead toilets
- Trail:
- This trail consists of formed track, timber boardwalk sections, metal mesh board walks, beach/rock platform walking
- Dogs:
- Dogs are NOT allowed
- Camping:
- At main campsites which have toilets, at secondary campsites without toilets
- Off-trail camping is allowed unless specifically prohibited
- Other:
- This walk can be done in either direction
- Its worth taking the guidebook for this hike with you or at least photocopy the relevant pages
- Bring wet weather gear, you definitely need it during the colder months of the year but likely year round
- Bring long gaiters, mainly for mud and leech protection
- There are a few foot cleaning stations along this track to help stop the spread root rot. Take the few minutes required to help preserve this trail
- No fire zone
- This walk is within a delicate world heritage area so open fires are not allowed. This means that to do any cooking you need a fuel stove.
- Fuel canisters (23o grams) and gas can be provided by Par Avion at the Melaleuca Airstrip. You will need to arrange this with Par Avion at the time of booking and pay in Hobart on check in
- Inlet crossings
- There are are number of inlet crossing on this trail. Most are natural crossings but there is also a row boat crossing over New River which will get the arm muscles working. You can’t bypass these crossings. Your only option is to return to your starting trailhead.
- Carry a copy of the tide times for this walk
- Pay attention to the tide times and where possible cross at low-lowish tide, if wading. At the New River row boat crossing, a high tide helps get the boats into the water
- Do your research on how to cross inlets if you aren’t familiar with this practice. The depth and conditions of these inlets will vary greatly so if there is any doubt, don’t cross, wait until the conditions are better
- There are are number of inlet crossing on this trail. Most are natural crossings but there is also a row boat crossing over New River which will get the arm muscles working. You can’t bypass these crossings. Your only option is to return to your starting trailhead.
Suggested Resources
In addition to the Australian Hiker Podcasts and write up the following resources will help with your planning
- Tasmanian Parks
- General trail information for the South Coast Track
- National Parks Access Permit
- Transport
- Air flight to Melaleuca trailhead via Par Avion
- Book early to get your desired day
- Bus transport to/from the Cockle Creek trailhead with Tasmanian Wilderness Experiences
- You can fit in with an existing service or book to suit you schedule
- Air flight to Melaleuca trailhead via Par Avion
- Guidebook
- Well worth purchasing to help with your planning and to provide a prompt at the start of each day on the trail
- Read our review of this guidebook here
Equipment suggestions
Everyone has preferences in relation to gear they carry on a hike. The following are some suggestions on things worth taking based on our trip:
- Extra socks
- Expect to get muddy and wet feet every day on this track
- Rinse the socks out each day and just re-wear them. If you wear dry socks each day they will be wet within about the first hour of hiking
- If you sleep with socks keep a pair set aside for this purpose
- Carry a length of cord/clothesline to dry out clothes
- Trowel and toilet paper
- Just in case you need to go in-between campsites
- With the exception of the trailheads you will need your own toilet paper
- Rain pants/rain jacket
- A must!
- Gaiters
- Mainly for minimising the impact of mud and leeches but also for snakes
- Camp shoes
- Its really rare I will carry more than one pair of footwear on a hike but consider a pair of lightweight camp shoes to allow your shoes to dry out at the end of each day
- Trekking poles
- A must!
- A water filter of some type
Have a look at Tim and Gill’s Multi Day Gear lists to use as a guide if you are quite sure what to take:
- Tim’s Gear List Currently being updated
- Gill’s Gear List
Disclaimer
This walk was undertaken by the team from Australian Hiker
Last Updated
25 June 2026